I definitely got the “bigger is better” bug a month or two back. No, I haven’t bought a new 800 gallon aquarium (yet). This post is going to discuss the kinds of options I was thinking about, why I dismissed most of them, and what I really intend to do.
First, however, why would bigger be better? There are a few specific advantages to larger scale:
- The bigger the aquarium, the more impressive looking it is
- The larger the volume of water, the more stable the environment. For example, the temperature of the water will take longer to change with a larger volume
- A larger volume of water can support a larger “bio load”. This means, you can keep more fish, corals, and other invertebrates in a larger aquarium
There are problems that come with a larger aquarium as well:
- It’s expensive. And not just the aquarium, either. The pumps, filtration systems, lighting, and even the aquarium stand seem to get logarithmically more expensive the larger the aquarium
- You need a larger space to put a larger aquarium. And, large aquariums are heavy! A 180 gallon aquarium weighs about 2,100 lbs. Don’t plan on putting that upstairs.
- A larger aquarium requires more sand and live rock to seem full
- The ongoing costs are considerably higher as well. Larger pumps and lighting draw more power. Water changes need more salt mix and other additives
Clearly, a larger aquarium would need a financial commitment. It would also need more work for things like water changes. But, look at the up side! More fish, more corals, a more stunning visual experience! This was not an easy decision. Mrs. Salty Geek was definitely getting frustrated with me changing my mind about every few days.
I looked around all over the place, trying to find a reasonably inexpensive way to get a newer, bigger aquarium. I watched Craig’s List for used aquariums. I searched around to see what new aquariums cost. There were a few that I found, but in each case I started thinking about the cost of live rock, sand, lighting, etc. and quickly changed my mind.
One day I stumbled upon ZeroEdge Aquariums. These things are way out of my price range, but the visual effect is stunning. Imagine a cube that is completely clear on all sides, and the top. It looks as if the top is a piece of glass, but in reality it’s an open top aquarium. The water runs over all four sides of the aquarium into a collection area, which then goes into the sump. The effect is an incredibly clean-looking aquarium, with no electronics or piping visible at all. Maybe one of those will pop up on Craig’s list!
In my quest to find an affordable upgrade path, I started thinking about Do It Yourself (DIY) projects for aquariums. I considered building an aquarium out of the three major aquarium materials: glass, acrylic, and plywood. Glass and acrylic both sounded like fun projects, but the materials would still have been almost as much as buying a pre-built aquarium at the size I was considering. Plywood could work. I was briefly considering an open top plywood aquarium. But, it just doesn’t seem as attractive as a transparent aquarium. Plus, you have to cover the plywood with something like fiberglass, so the materials are still fairly expensive.
In the end, I decided that my existing 48 gallon bow front aquarium was an attractive, reasonably sized aquarium to start with. So, I’ve stopped looking for aquariums for now. Instead, I’m going to increase the water volume by adding a sump. A sump is another tank, usually below the display aquarium, that holds most of the pumps, filters, and other electronics that would otherwise be in your display tank. It also holds a volume of aquarium water.
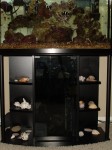
Here is the challenge… The aquarium stand I have now doesn’t have a cabinet. Well… it has something, but as you can see, in the photo to the right, the enclosed area is tiny. And, it’s got a glass front. Try as I might, I simply wasn’t able to fit a sump in that small area. I even thought about designing a sump in two stages, one on top of the other, with the bottom stage holding the protein skimmer. But, I simply couldn’t fit the protein skimmer and a return pump in an area 13 inches wide by 11 inches deep.
So, I’ve decided to build a new aquarium stand. In a future post I will describe how my father and I built an aquarium stand. Later, I’ll also describe how I built the sump and plumbed everything together.
